Visual Studio

VS2017RC Tooling on Linux

What better way to try out VS2017 RC, by creating a .Net Core solution on windows, and building it on linux.

However the standard .Net core installation guide for Linux, as of the date of this post, will not build VS2017 RC projects, due to it utilising *.csproj files, and no longer creating xproj / project.json files.

Expect an error along the lines of:

[user@localhost]$ dotnet run
The current project is not valid because of the following errors:
/home/user/DotNetCoreASP(1,0): error DOTNET1017: Project file does not exist '/home/user/DotNetCoreASP/project.json'.

A version check will show that the "latest" is quite on the bleeding edge as it needs to be.

[user@localhost /opt/dotnet]$ dotnet --version
1.0.0-preview2-1-003177

Compare this to Powershell after a VS2017 .Net Core install in the windows box.

PS C:\> dotnet --version
1.0.0-preview3-004056

Initially, the only option looked to be building from the preview branch in git.

However, there is a series of preview binaries available for those looking to hit the ground running faster.

https://github.com/dotnet/core/blob/master/release-notes/preview3-download.md

Howover, that is waye tyopo easy.

Building the .Net CLI in Linux

Let's build us the .Net CLI.

After a git clone, switch to the preview 3 branch.

git checkout -b re1/1.0.0.0-preview3

Initally, it's going to take a while, the bash that kicks it all off is  /build.sh

The scripts go three to four deep ,at least. Adding a set -x to the top level script next to the existing set -e will give us some visibility into how the build is going.

#!/usr/bin/env bash
#
# Copyright (c) .NET Foundation and contributors. All rights reserved.
# Licensed under the MIT license. See LICENSE file in the project root for full license information.
#

# Set OFFLINE environment variable to build offline

set -e
# Enable recursive debugging for verbose output
set -x

SOURCE="${BASH_SOURCE[0]}"
...

Post Build

Once built set up a new symlink. As it will be to the same executable, dotnet, create it in a subfolder to /user/local/bin, and then remove it, and remove the folder.

sudo mkdir /usr/local/bin/dotnet-preview3-dir
sudo ln -s /home/user/dev/cli/artifacts/centos.7-x64/stage2/dotnet /usr/local/bin/dotnet-preview3-dir
sudo mv /usr/local/bin/dotnet-preview3-dir/dotnet /usr/local/bin/dotnet-preview3
sudo rm /usr/local/bin/dotnet-preview3-dir -r

You can then have a stable binary, and a build version running side by side.

Troubleshooting

One nasty looking error I bumped into was this one, in red, making it extra ominous.

$ dotnet run
/opt/dotnet/sdk/1.0.0-preview3-004056/Microsoft.Common.CurrentVersion.targets(1107,5): error MSB3644: The reference assemblies for framework ".NETFramework,Version=v4.0" were not found. To resolve this, install the SDK or Targeting Pack for this framework version or retarget your application to a version of the framework for which you have the SDK or Targeting Pack installed. Note that assemblies will be resolved from the Global Assembly Cache (GAC) and will be used in place of reference assemblies. Therefore your assembly may not be correctly targeted for the framework you intend. [/home/user/DotNetCore/hwapp/hwapp.csproj]

The build failed. Please fix the build errors and run again.

Let see, its mention Net 4.0, and a GAC< on a LInux bo-x that is running .Net Core.

Not looking good. There are no .Net 4.0 References in the project and the whole point of .Net Core is to stand alone with a dependency on Mono. As for the GAC reference, this message doesn't give is much to go on.

Until you realise all you need to do is restore the project.

dotnet restore

It does show that while the base cross-platform functionality is there, removing the legacy windows reference is going to be some time away for this fledgeling framework.


Microsoft Azure has successfully lured me in with their promises of a VS2014 CTP VM.

Recently completed MVC training was my first introduction to Azure, so outside a learning environment the VS CTP was a chance to dust off the account.

Trial Account & Credit Card Registration

While I was hesitant to hand lover my Credit Card number, expecting the usual incurred charges if you don't cancel, Azure surprised me with being up front about what my next bill would be, and that it would be 0.00

AzureBill

Having that on the first page that opens when I click on billing, is transparency that will go along way with those who are less trusting of cloud computing.

Spooling up the VS 2014 VM

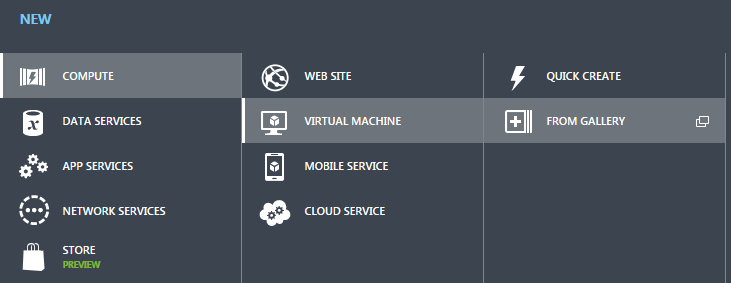
All very straight forward, select add, and select VM for Gallery for existing images.

AzureVM

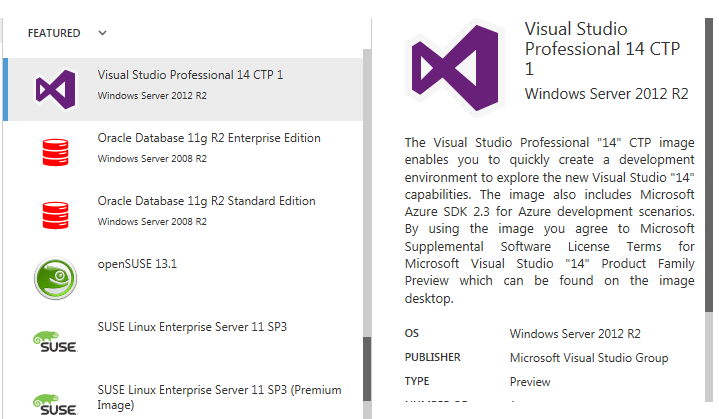
Select the VS2015 CTP

AzureVS


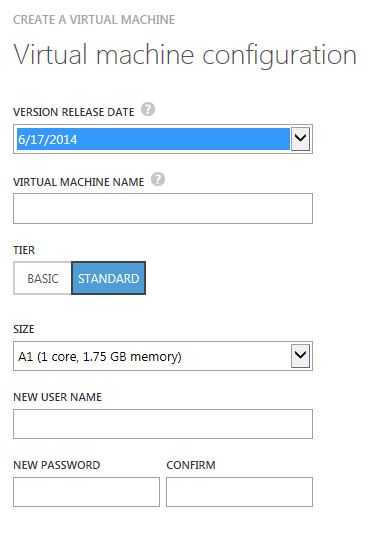
Minimum required info to get me started... not bad.

AzureConfig

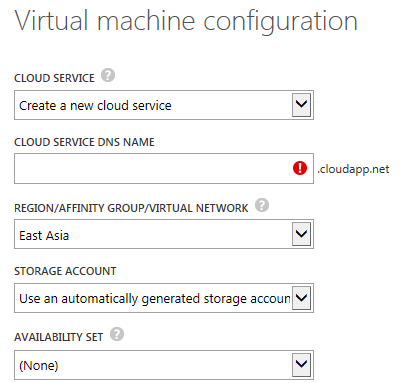
AzureNetConfig


Now if this is your first VM, note the Cloud Service DNS name will be reused for all VM's.

Remote Access to your VM

Under endpoints check the RDP public port. This will access your machine via NAT.

AzureEndPoints

RDP into <CloudServiceDMSName>.cloudapp.net : 59276 (in is case), and you're in.

AzureEndPoints AzureDesktop

After Integrating Visual SVN & Jira with Slack, I decided to replace the existing bat file calling a python script with something a bit more extensible.

I also wanted to change Slack's SVN integration to a custom one that would point to the revision on our Fisheye server, which would show the changes made and link to Jira when we added the  ticket <ProjectName-Ticket#> in the Commit Notes, which Fisheye does out of the box

.Net REST Console App

I decided to build a console app that call the slack incoming webhooks API. It needed to:

  • Accept a channel name, title & API Token
  • Accept a SVN Projectname & revision number to call SVNlook & get author & log details. (When fired by SVN Server)
  • Accept a Jenkins name to hit up the Jenkins JSON API for build details
  • Parse success/fail messages and convert them to the Slack notification color names (good, warning & danger)
  • Create a JSON Object
  • Post the JSON object to the slack API
  • A verbose option for debugging
  • Manually enter message text, and author to integrate with other apps down the line.

.Net Apache Common CLI

As there is quite a large set of parameters, I made use of the .Net port of the Apache Commons CLI libraries by Akutz. This handles all aspects of console arguments, while adhering to best practices and existing expectation when passing argument to a cone application.

An example of the init & usage syntax is below.

options.AddOption("a", "apiToken", true, "API token.");
...
get
{
  if (_apiToken == null && Globals.CMD.HasOption('a'))
  {
     _apiToken = CMD.GetOptionValue('a');
  }
  return _apiToken;
}

This is a huge help in argument management, and also handled the help messages.

There was very little documention on .Net CLI, though using the Apache usage documentation was fine, just remeber to capitalise the method name i nthe .ent vesrion, for example option.AddOption instead  of option.addOption, option.HasOption instead of option.hasOption and so on.

And one last catch, the Apache DefaultParser was called the BasicParser in the .Net port.

BasicParser parser = new BasicParser();
CommandLine commandLine = parser.Parse(options, args);

RestSharp

Restsharp likely needs no instruction has a library for simple Rest messaging.

I found it very easy to use, apart from one hitch that had me stumped for much longer than I would like to admit.

The following code (I thought) added the query string with the API token for slacker to the url.

 var request = new RestRequest(resource, Method.POST);
request.AddParameter("token", "CfkRAp1041vYQVb");

However, doing so, and then trying to add any details to body via request.AddBody resulted in it not being added, nor raising an error attempting to do so.

request.RequestFormat = DataFormat.Json;
request.AddBody(json); //Ignored if AddParameter was previously called

Opening up Wireshark showed that the query string was being added to the body.

After a bit of head scratching I found that AddParameter took a third argument,

request.AddParameter("token", "CfkRAp1041vYQVb", ParameterType.QueryString);

SVN versioning

As I planned to use this exe on various production servers, automated SVN versioning was the next logical step.

I utilised Avi Turner's SVN versioning script on stackoverflow to update the $WCREV$ tag I inserted into the AssemblyFileVersion in AssemblyInfo.cs and rev.subwcrev-template used to track the currently checked out & built version.

 Costura.Fody

Finally, I though I would try my hand at weaving assemblies into the .exe for a single file deployment.

I settled on Costura.Fody as many had said that it Just Works™

After adding both Fody and Costura.Fody via the VS2013 package manager, I assumed the various build xml files automatically would need to be tweaked. Though, when I hit build, I realised that I didn't need to touch them at all, and ended up with a exe file where every assembly set to copy local, in this case RestSharp, was embedded into the exe.

Though I would give an assembly Hello World a go, and get into some low level programming.

After reading up in MASM, NASM & FASM, I decided on MASM, and soon came across a great blog detailing how to set up VS2013 to run with MASM32.

After setting up the environment, and running the hello world app below, I noticed that this use of the MASM32 libraries seemed to vary greatly from the Assembly code I have previously seen that typically utilsie a series of 3 and 4 letter instructions mixed with memory addresses,

.386
.model flat, stdcall
.stack 4096
option casemap : none

include windows.inc
include masm32.inc
include user32.inc
include kernel32.inc
include macros.asm

includelib masm32.lib
includelib user32.lib
includelib kernel32.lib

.data
message   db "Hello world!", "$"

.code
main PROC
	print "Hello World!"
	invoke ExitProcess, eax
main ENDP
END main

In my travels, the assembly I have glanced upon seemed to be much more like the below example, which I bumped into while I was setting up Visual Studio

.model small
.stack
.data
message   db "Hello world", "$"
.code
main    proc
mov   ax, seg message
mov   ds, ax
mov   ah, 09
lea   dx, message
int   21h

mov   ax, 4c00h
int   21h
main    endp
end main

I naively assumed that this was what MASM was like when you didn't utilise the MASM32 Libraries references in the first example. That was, until trying to compile the above code hit me with this...

1>  Assembling source.asm...
1>source.asm(7): error A2004: symbol type conflict
1>source.asm(16): warning A4023: with /coff switch, leading underscore required for start address : main

As it seem this is a common mistake, replies at the masm32 forums, and stackoverflow pointed out the difference between 16bit MASM, and MASM32.

I still wanted to push forward with 16bit MASM, but with Win7 x64 not supporing 16bit, I figured I may have to use DOSbox.

I now knew I needed a 16bit Linker, and a bit of digging showed me that there was one in my MASM32 install. I tried looking in the project configuration, such as the Microsoft macro assembler to see if I could find a place to poitn to the linker16.exe, with no luck.

I then came across this very detailed article on both 16 and 32 bit set up in VS2012 by Kip Irvine.

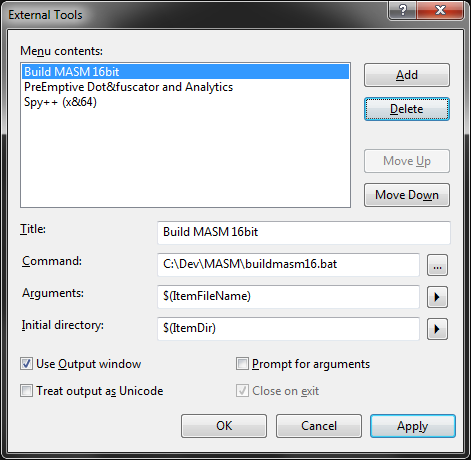
With his directions. I then went down the path of a batch file triggered by Visual Studio  External Tools. Hoeever I wanted to dig a bit deeper and make my own batch file.

After finding a githib reference to the make16.bat in his tutorial, it seemed that he utilised ml.exe that was part of Visual Studio, not the MASM32 downloads. Running a modified version gave me the following error.

MASM : warning A4018: invalid command-line option : -omf

MSDN ML Command Line Reference advised me that this was due to my 64bit install.

Generates object module file format (OMF) type of object module. /omf implies /c; ML.exe does not support linking OMF objects.
Not available in ml64.exe.

I decided to go with the ML.EXE installed with the MASM32 libraries, along with the commands I came across on stack overflow. I Modified the bat to utilise the args passed from VS External Tools.

ExternalTools

ML.EXE /DMASM /DDOS /Zm /c /nologo /I"c:\masm32\Include" "%1.asm"
link16.exe /NOLOGO "%1.obj" ;

The semicolon I added at the end of the link16.exe args use default settings, so do not require input. Perfect if you want the build result in the VS output window instead of a DOS window.

MASMBuild

Now I got my MASM16 hello world assembled, I just needed a 16bit platform to run it.

I went with DOSbox as it has the command line arguments i was hoping for, so I could integrate it with VS External Tools.

I created the following batch file, accepting the filename from External Tools as %1.

"C:\Program Files (x86)\DOSBox-0.74\dosbox.exe" C:\Dev\MASM\Masm32\%1.exe

Though, it seems that External Tools wraps this in quotes, resulting in the location of the newly assembled exe for DOSbox to run, not being valid.

C:\Dev\MASM\Masm32>"C:\Program Files (x86)\DOSBox-0.74\dosbox.exe" C:\Dev\MASM\M
asm32\"source16".exe

The build scripts seemed to be ok with this, as it also ucrred there. However the following command trimmed the double quotes and allowed the exe to be passed into Dos Box

SET FILE=%1
SET FILE=%FILE:"=%
"C:\Program Files (x86)\DOSBox-0.74\dosbox.exe" C:\Dev\MASM\Masm32\%FILE%.exe

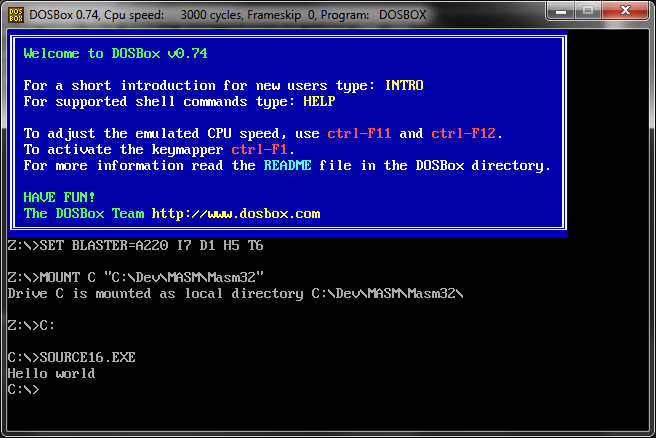
And success.

DOSBox